Article Introduction
PVC drainage pipe gets blamed for a lot of failures it didn’t cause. We hear it constantly: “the pipe failed in two years, must be a bad batch from the manufacturer.” Nine times out of ten, the material is fine — the installation was wrong. Solvent joints assembled without proper prep, pipes laid against the fall, cleanouts missing where they’re needed. PVC-U drainage systems are forgiving, but only up to a point.
This guide covers the correct installation method for PVC drainage pipe — what to measure, how to bond solvent joints properly, and the seven steps our own installers follow on the job. If you’re an installer, contractor, or project supervisor, this is the practical checklist to keep on site.

Can You Connect PVC drainage Pipe Without Glue?
- If you want to avoid the mess of cement and primer, there are ways to connect PVC drainage pipe without using glue. However, if you want to transport water, any other liquid, or gas, your options are limited. Cement is typically required to carry fluids, though it means the only way to disassemble your pipes is by sawing them apart.

- One alternative to glue is the use of PVC push-on fittings, which are fitted with rubber O-rings. These provide a strong enough connection to transport water safely.

- If you don’t need to transport a liquid or gas, you can simply push your PVC parts together. Compatible parts will fit snugly and won’t come apart without outside pressure. This is useful if you need a connection that you can easily take apart.


Why You Should Use Glue to Connect PVC drainage Pipe
While PVC drainage pipes can fit together without glue, gluing them is the key to a permanent leak-free seal. PVC solvent cures quickly and creates a strong hold between pipes and fittings that can only be broken by sawing the pipes.
If PVC drain pipes are not bonded together, the following problems may occur:
1. Leakage: The joints of PVC pipes are not bonded together, which can easily cause water to leak at the joints. Long-term leakage may cause moisture in the surrounding area and even damage walls, floors or other structures.

2. Poor water flow: Loose connections may cause poor water flow or even blockage. This will affect the efficiency of the drainage system and may cause water to accumulate in the pipes, increasing maintenance costs.

3. Pipe detachment: In some cases, the pipes may detach due to the pressure of water flow or external forces, resulting in complete failure.

4. More difficult to maintain: If the pipes are not properly bonded, they may be more difficult to disassemble in the future if they need to be repaired or replaced, increasing workload and costs.

What kind of material are you using?
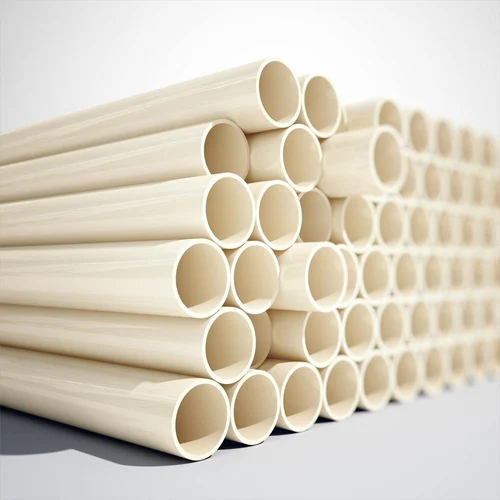
The first step to ensuring you use the correct adhesive is to correctly identify your pipe and fittings material. PVC is generally white, whereas CPVC is usually light gray or cream colored, and CPVC CTS is a tanish/yellow color. If you are still not certain after looking at the color of the pipes, PVC, CPVC, and CPVC CTS pipes all come with the technical specifications printed on them.

Is There a Specific Type of Glue to Use?
- The glue used to connect PVC piping and fittings is highly specific. It doesn’t work like ordinary adhesive, and is better thought of as a chemical solvent. It works by melting the surface of the PVC, then quickly hardening to fuse attached pieces with an airtight, seamless, leak proof bond. The results are similar to welded metal.
- It’s important to pick the proper solvent for PVC pipe. Carefully read product labels and avoid universal solvent cements.
- For a reliable seal, you’ll need to use a primer with your PVC solvent. Purple primer is usually required by building codes. The bright color allows inspectors to see that all fittings have been primed.


PVC Drainage Pipe Proper Installation Method
1. Choose the Right Pipe and Joint System
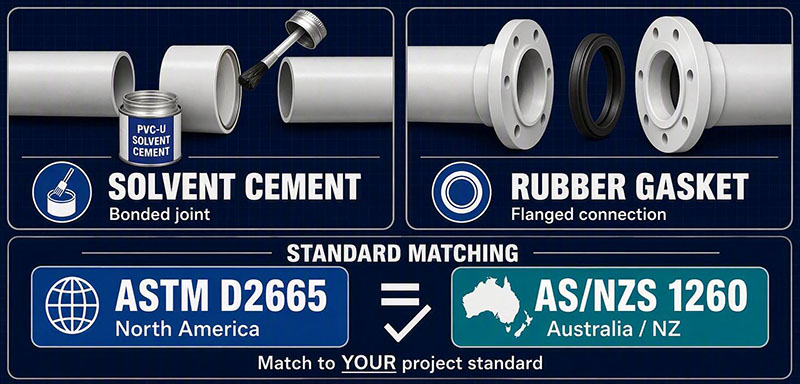
Use PVC-U solid wall drainage pipe with solvent cement joints or rubber gasket (flanged) connections, matched to the standard your project follows — ASTM D2665 in North America, AS/NZS 1260 in Australia and New Zealand. Pipe and fittings must come from the same standard family; mixing ASTM pipe with AS/NZS fittings is a joint failure waiting to happen.
2. Measure and Sketch Before You Cut
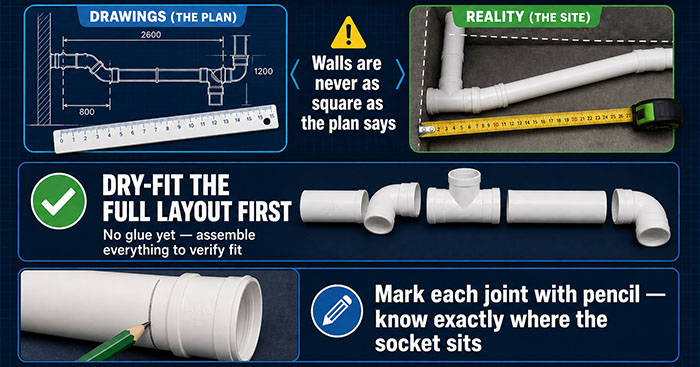
Work from the drawings, then measure the actual run on site — walls are never as square as the plan says. Dry-fit the full layout before gluing anything, and mark each joint with a pencil so you know exactly where the socket sits. This is the step that saves the most rework, and it’s the one most rushed crews skip.
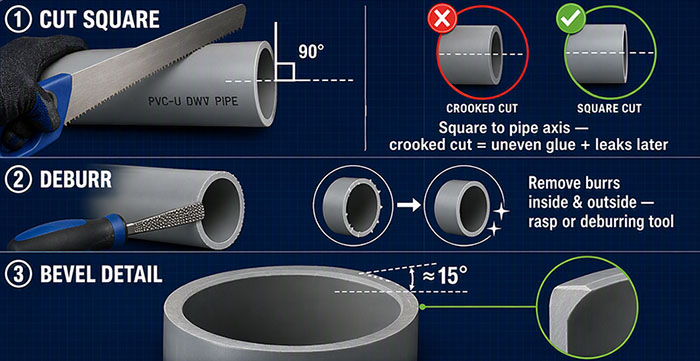
3. Cut Square and Bevel the End
- Cut pipe with a fine-tooth saw, square to the pipe axis — a crooked cut means uneven glue distribution and a joint that leaks later.
- Remove the burrs inside and outside with a rasp or deburring tool, then bevel the outer edge at approximately 15°. The bevel matters: it prevents the pipe from scraping cement off the socket wall during insertion.
4. Dry-Fit, Mark Depth, Then Prepare Surfaces
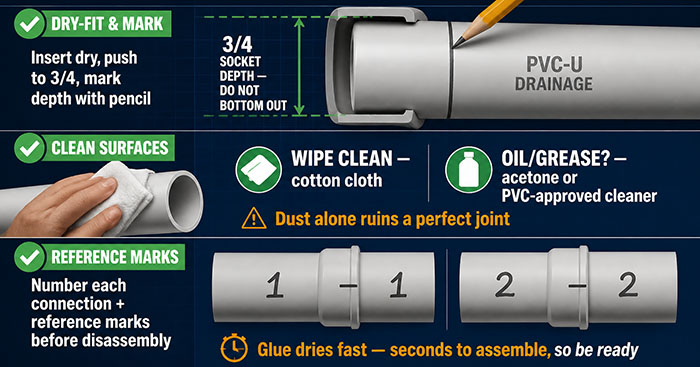
- Insert the pipe into the socket dry first. Push to about 3/4 of socket depth — do not bottom out in the dry test — and mark the depth with a pencil. Remove, then wipe the bonding surfaces clean with a cotton cloth. If there’s oil or grease, clean with acetone or a PVC-approved cleaner; dust alone will ruin an otherwise perfect joint.
- PVC glue dries fast, and you’ll only have a few seconds to put the pipes together when it’s applied. Before you take apart your dry-fit assembly, make reference marks and number each connection so you can quickly put everything back in place when it’s time.
5. Apply Solvent Cement and Join Immediately
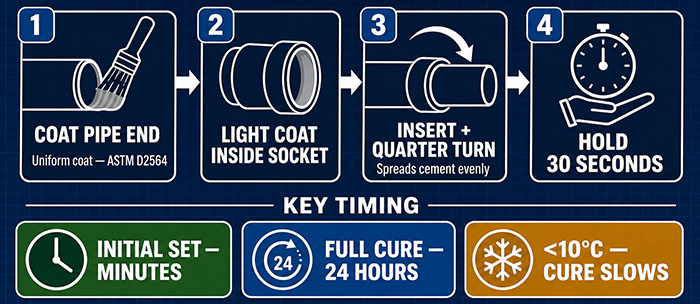
Apply a uniform coat of PVC solvent cement (per ASTM D2564) to the pipe end first, then a light coat inside the socket. Insert the pipe to your depth mark and rotate it a quarter turn — that rotation spreads the cement evenly and seats the joint. Hold for about 30 seconds. Initial set takes minutes; full cure takes 24 hours at room temperature. Below 10°C, cure slows — allow extra time, and never pressure-test a cold-cured joint the same day.
6. Set Slope and Support Before the Glue Cures
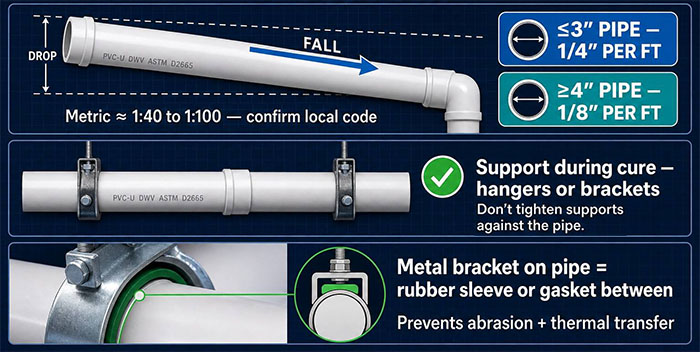
Gravity drainage is only as good as its fall. Standard practice: 1/4 inch per foot for pipes up to 3 inches, 1/8 inch per foot for 4 inches and larger (roughly 1:40 to 1:100 fall in metric) — but always confirm against your local code. Support the line with hangers or brackets while the joints cure, but don’t tighten supports against the pipe; where a metal bracket touches the pipe, use a rubber gasket or sleeve between bracket and pipe to prevent abrasion and thermal transfer.
7. Install Cleanouts and Protect the Line
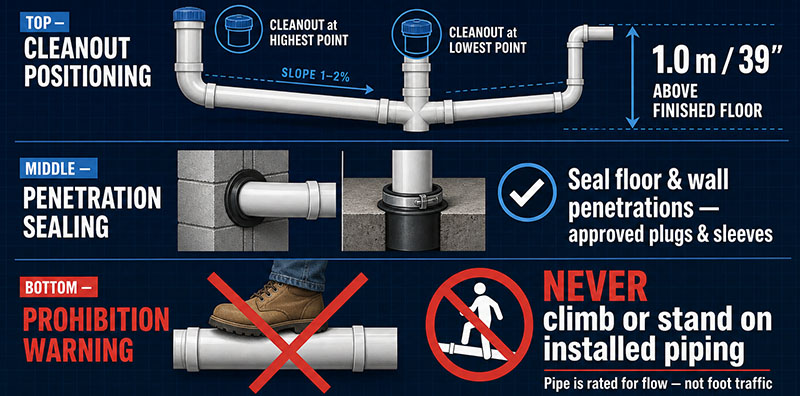
Install a cleanout (inspection opening) at the lowest and highest points of the drainage run, with the cleanout center roughly 1.0 m (39 inches) above the finished floor for accessibility. Seal floor and wall penetrations with approved plugs and sleeves, and never climb or stand on installed piping — the pipe is rated for flow, not for foot traffic.
Notice:Consult your glue’s manufacturer instructions for information about how long you need to wait before handling the connected PVC. Repeat these steps to attach any remaining PVC pipe connections for your project.
Summary
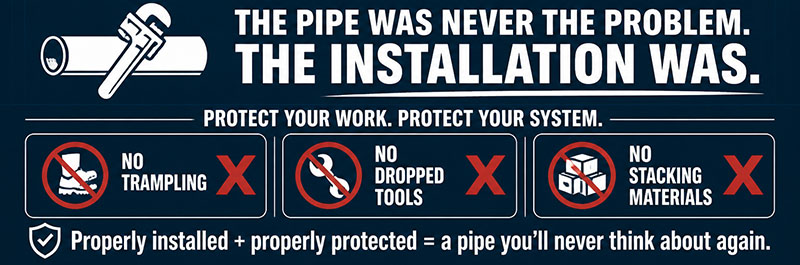
Follow these seven steps and you get what the pipe is designed to deliver: decades of service from a PVC-U drainage system. Skip them — especially the prep work before solvent bonding — and no material grade will save you. The pipe was never the problem; the installation was.
One last reminder for the site crew: protect the installed line. No trampling, no dropping tools on it, no stacking materials on top. A pipe that’s properly installed and properly protected is a pipe you’ll never think about again — which is exactly how it should be.
If you would like to purchase or learn more about PVC pipes and fittings, please contact our team. The team will assist you and help you solve all your problems!
About SAM-UK
SAM-UK are a professional 18+ years manufacturer in producing vinyl building profile products and PVC , CPVC , PPH , PPR , PP pipes and pipe fittings, valves, taps and so on. We own the certificates of SGS\SONCAP\ISO9001\CE\NSF,support color /size customization. Welcome to consult for Catalog and Product. you can contact us at email [email protected]